Quick & Easy Panko Chicken: Your Go-To Crispy Weeknight Dinner Solution
Tired of the same old weeknight dinner routine? Are you constantly searching for a meal that's both satisfyingly delicious and incredibly fast to prepare? Look no further than crispy panko chicken! This culinary marvel transforms ordinary chicken breasts into a golden, crunchy delight that’s ready in mere minutes. Forget bland, forget boring – this dish promises tender, juicy chicken encased in an irresistible crust, making it a firm family favorite and a true savior for busy evenings. Think of it as the elevated, sophisticated cousin of the classic chicken nugget, perfect for grown-ups and kids alike.
What makes panko chicken so special? It’s the perfect blend of simplicity and incredible texture. Whether you're a seasoned home cook or just starting out, this recipe is designed for success. It leverages smart shortcuts without sacrificing flavor or quality, ensuring you spend less time slaving over a hot stove and more time enjoying a quality meal with your loved ones. Get ready to add a new staple to your dinner rotation that will have everyone asking for seconds.
The Magic of Panko: Unlocking Unrivaled Crispiness
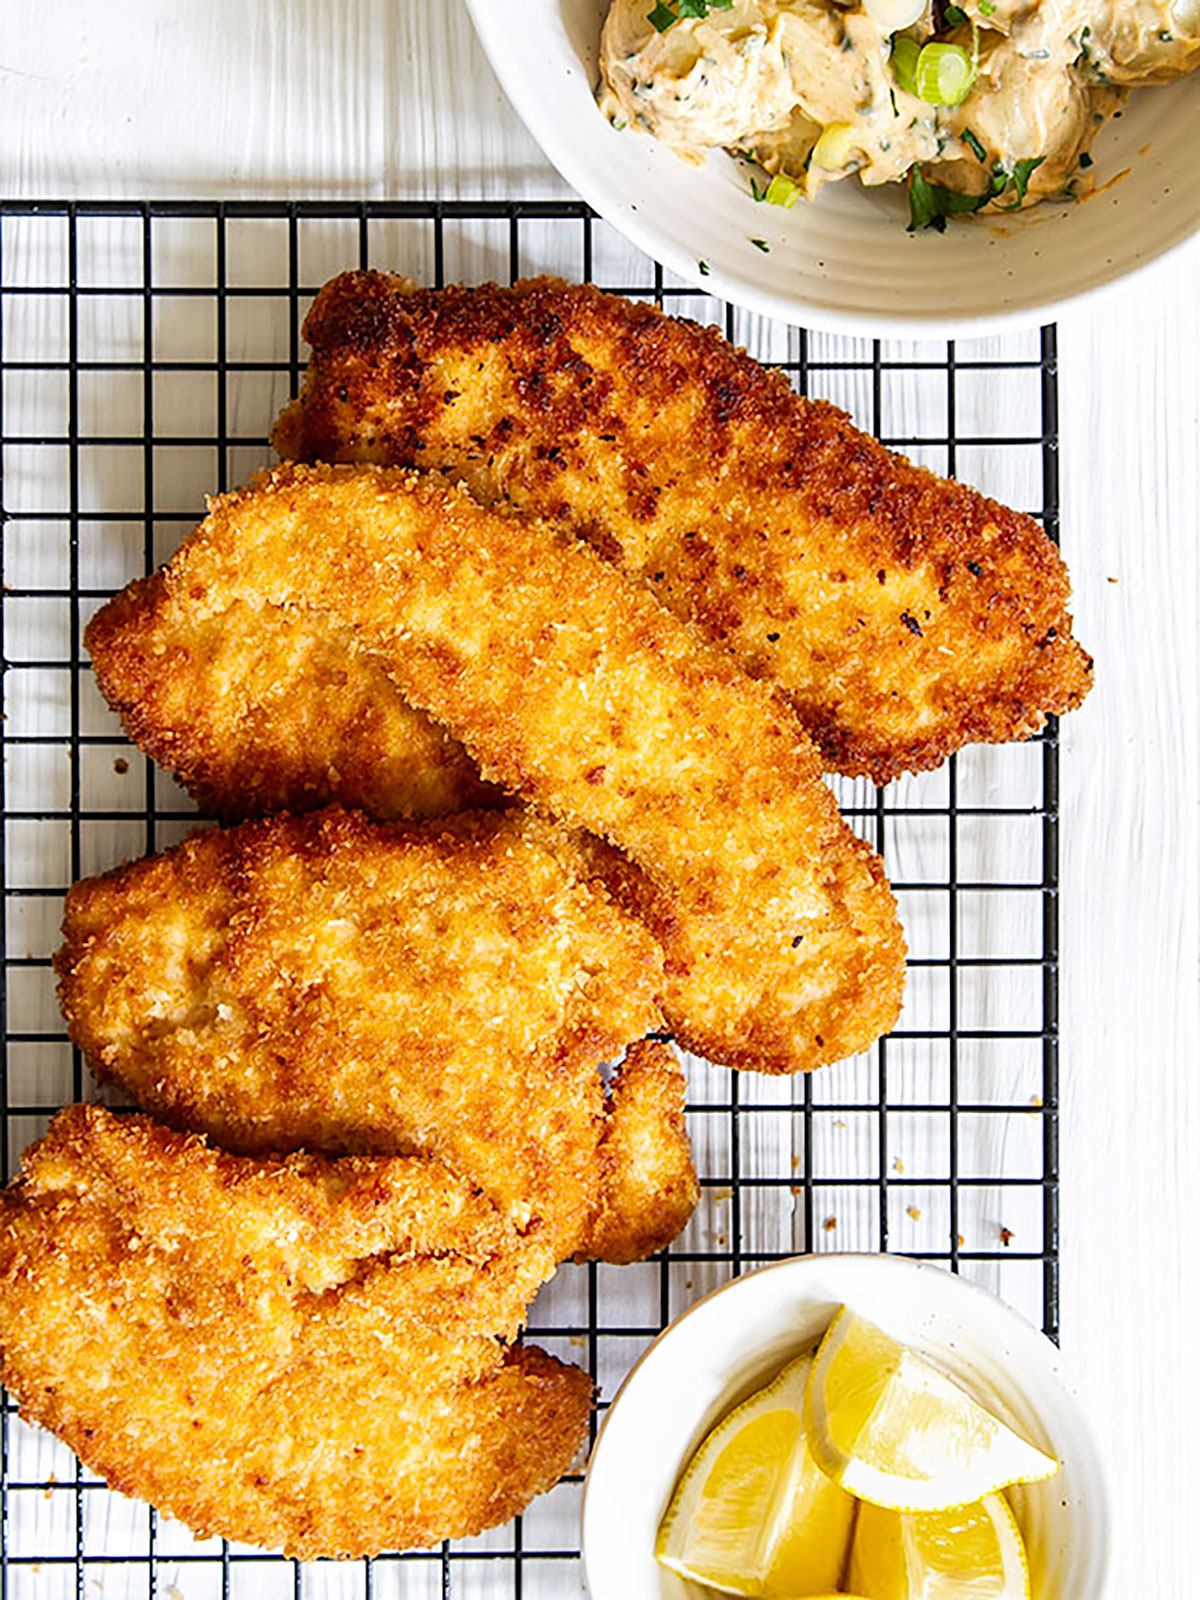
The secret to this chicken's extraordinary crunch lies in its namesake: panko breadcrumbs. Originating from Japan, panko is not just any breadcrumb; it's a game-changer. Unlike traditional breadcrumbs, which are often dense and finely ground, panko is made from crustless white bread that's processed into larger, flakier, and airier shards. This unique texture provides several key advantages that elevate your crispy chicken experience:
*
Superior Crunch: Panko's irregular, airy flakes create a lighter, crispier coating that holds its crunch much longer than standard breadcrumbs. They stand up beautifully to the heat of cooking, creating a delightful shatter with every bite.
*
Less Oil Absorption: Thanks to their porous structure, panko breadcrumbs absorb less oil during cooking. This results in a less greasy, lighter-tasting crust that’s healthier and allows the true flavor of the chicken and seasonings to shine through.
*
Golden Perfection: Panko toasts to a beautiful, uniform golden brown, making your chicken look as good as it tastes. This visually appealing crust is a hallmark of a well-prepared dish.
When you use panko, you're not just breading chicken; you're crafting a textural masterpiece that’s guaranteed to impress. It’s this distinctive quality that makes panko chicken so addictive and memorable, ensuring it becomes a highly anticipated meal on your weekly menu.
Mastering the Crispy Panko Chicken Technique
Achieving perfectly crispy and juicy panko chicken is surprisingly straightforward, thanks to a few essential techniques that streamline the process and guarantee stellar results.
The Crucial First Step: Pounding Chicken Cutlets
One of the most vital elements for quick and even cooking, as well as achieving tender meat, is properly preparing your chicken breasts. Instead of cooking thick, uneven breasts, we transform them into uniform cutlets.
*
Why Pound? Pounding boneless, skinless chicken breasts serves multiple purposes. Firstly, it tenderizes the meat, breaking down tough fibers. Secondly, it creates an even thickness, ensuring the chicken cooks through quickly and uniformly, preventing dry spots. Finally, it increases the surface area, allowing for maximum breading coverage and more of that delightful crispy crust. This technique is similar to what you'd use for classic Chicken Paillard or Milanese, and it's a non-negotiable for speedy perfection.
*
How to Pound: Place one chicken breast at a time in a resealable plastic bag or between two sheets of plastic wrap. Using a meat mallet, the flat side of a heavy pan, or even a rolling pin, gently but firmly pound the chicken until it’s about ½-inch thick. Aim for an even thickness across the entire cutlet.
Building the Perfect Breading Station
A well-organized breading station is key to efficiency and a thorough coating. For our quick panko chicken, we’ll focus on an egg-panko dredge for ultimate crispiness without unnecessary steps.
*
The Setup: You'll need two shallow bowls. In the first, lightly beat an egg or two (depending on the amount of chicken) with a splash of water or milk to create an egg wash. In the second, combine your panko breadcrumbs with a generous seasoning blend. This is where you infuse a ton of flavor!
*
Seasoning the Panko: Don't just use plain panko. Elevate the flavor by mixing in Parmesan cheese (for a savory, cheesy crunch), garlic powder, onion powder, sea salt, and black pepper. A pinch of smoked paprika can add a beautiful color and depth. For a more sophisticated flavor profile, consider adding dried herbs like oregano or thyme.
*
The Dipping Process: Dip each pounded chicken cutlet into the egg wash, ensuring it’s fully coated. Let any excess egg drip off. Then, transfer the chicken to the seasoned panko mixture. Press the chicken firmly into the crumbs on both sides, ensuring a thick, even layer of panko adheres. This pressing action is crucial for a strong crust that won't fall off during cooking. Arrange the coated cutlets in a single layer on a plate while you finish the rest. For more in-depth strategies on achieving that perfect crunch and tenderness, check out our guide on
Secrets to Crispy & Juicy Panko Chicken: Pound, Coat, & Cook.
Cooking for Golden Perfection: Pan-Frying vs. Baking
While the recipe title hints at speed, you have a couple of excellent options for cooking your panko chicken, each with its own advantages.
*
Pan-Frying for Maximum Speed and Crisp: For a truly "ready in minutes" experience, pan-frying is your best bet. Heat about ¼ inch of a high-smoke point oil (like corn oil, vegetable oil, or canola oil) in a large skillet over medium-high heat. Once the oil shimmers, carefully add the coated chicken cutlets, making sure not to overcrowd the pan. Cook for about 2 to 3 minutes per side, or until deeply golden brown and cooked through. The thinness of the cutlets means they cook incredibly fast, staying juicy on the inside while developing that enviable exterior.
*
Baking for a Hands-Off Approach: If you prefer a slightly healthier, less hands-on method, baking is an excellent alternative. Preheat your oven to 400°F (200°C). Place the breaded chicken on a baking sheet lined with parchment paper or a wire rack set over a baking sheet (for maximum air circulation and crispiness). Bake for 15-20 minutes, flipping once, until golden brown and cooked through (internal temperature reaches 165°F/74°C). While slightly longer than pan-frying, it allows you to multitask on side dishes.
Beyond the Plate: Serving Suggestions & Variations
Crispy panko chicken is incredibly versatile, making it easy to create a complete and satisfying meal.
Classic Pairings
For a well-rounded dinner, serve your golden panko chicken with simple yet delicious sides. A fresh, crisp house salad with a light vinaigrette provides a refreshing contrast, while roasted vegetables like baked zucchini slices, asparagus, or broccoli florets complement the richness of the chicken. Creamy mashed potatoes or fluffy rice are also excellent comfort-food choices that soak up any delicious pan drippings.
Creative Twists and Flavor Variations
Don't be afraid to experiment! Panko chicken serves as a fantastic base for various global flavors:
*
Asian-Inspired: Serve with a drizzle of sweet chili sauce or a soy-ginger dipping sauce, alongside stir-fried greens and jasmine rice.
*
Italian Flair: Top with a spoonful of warm marinara sauce and a sprinkle of fresh mozzarella, then broil briefly until melted and bubbly. Serve with pasta or a simple Caprese salad.
*
Spicy Kick: Add a pinch of cayenne pepper or red pepper flakes to your panko mixture, and serve with a sriracha mayo for a zesty, flavorful meal.
*
Sandwich Star: Slice the cooked chicken and use it in crispy chicken sandwiches with your favorite toppings like lettuce, tomato, and a tangy sauce.
Dietary Adaptations
For those seeking gluten-free options, this recipe can be easily adapted. Simply substitute the panko breadcrumbs with an equal amount of crushed, crisp rice cereal squares (like Rice Chex). The result is a surprisingly similar texture and a delicious, gluten-free crispy chicken.
If you're looking to elevate your weeknight meals even further and explore more delicious ideas beyond the basic, don't miss
Beyond Nuggets: The Ultimate Crispy Panko Chicken Recipe.
Practical Tips for Panko Chicken Success
To ensure every batch of your panko chicken turns out perfectly golden and crisp, keep these tips in mind:
*
Don't Overcrowd the Pan: When pan-frying, cook in batches if necessary. Overcrowding lowers the oil temperature, leading to steamed chicken rather than crispy.
*
Monitor Oil Temperature: Ensure your oil is hot enough before adding the chicken. A good test is to drop a tiny pinch of panko into the oil; if it sizzles immediately, it's ready. If it smokes, it's too hot.
*
Season Generously: Don't be shy with seasonings in your panko mixture. This is where most of your flavor will come from!
*
Pat Chicken Dry: Before dredging, gently pat your chicken breasts dry with paper towels. Excess moisture can prevent the egg wash and panko from adhering properly.
*
Meal Prep Friendly: You can pound and even bread the chicken cutlets a few hours ahead of time. Store them in the refrigerator on a plate, covered loosely with plastic wrap, until ready to cook. This makes weeknight dinner even faster!
Conclusion
Quick and easy panko chicken truly lives up to its name, delivering a supremely crispy, juicy, and flavorful meal that's ready in minutes. It's the ultimate answer to the age-old weeknight dinner dilemma, offering a delicious escape from culinary monotony without demanding hours in the kitchen. With its satisfying crunch, tender interior, and endless versatility, this panko chicken recipe is destined to become a beloved cornerstone of your family's meal rotation. So, grab your panko, pound those chicken breasts, and prepare to delight in a meal that proves gourmet taste can absolutely come with weeknight speed and convenience. Give it a try tonight – your taste buds (and your schedule) will thank you!